
Growing potatoes at home doesn’t take a big garden or complicated tools. In fact, I grow mine right in containers! It’s simple and fun, and the results are so satisfying. If you’ve got a bit of space and some patience, I’ll show you every step I take to grow healthy, delicious potatoes—from prep to harvest!
Contents
Step 1: Prepare for Sprouting
Before I plant anything, I always start by preparing the potatoes and a sprouting basket. This first step sets the foundation for good growth.
Line Your Basket
I take a clean basket or crate and line it with straw. The straw helps cushion the potatoes and provides airflow. It also helps keep the moisture balanced during sprouting.

Line the basket
Choose and Cut the Potatoes
I use about 10 to 12 potatoes. Each one already has tiny buds or “eyes” beginning to sprout. These little buds are essential—where the plants will grow from!

Potatoes with tiny buds
Then, I carefully cut each potato in half with a sharp knife. I make sure not to damage the buds. Cutting the potatoes helps me double the number of pieces I can plant. It’s a great way to stretch your harvest.

Cut the potatoes
Place Potatoes Sprout Side Up
Once the potatoes are cut, I place them into the basket. I ensure the cut side touches the straw and the sprouts point upward. This position helps the sprouts grow strong and straight.

Place potatoes sprout side up
Cover and Let Them Sit
I cover all the potato pieces with another layer of straw. They should be completely hidden.
Then, I place a lid over the basket. It’s crucial that the lid allows air to flow—don’t use anything airtight.
Step 2: Check Sprouts After 5 Days
After waiting patiently, it’s time to check the potatoes and see how the sprouts are doing.
I gently remove the straw and take a peek. The buds are much longer than before! They look strong and ready to plant. This short sprouting step helps give the potatoes a head start before they go into the soil.

Potatoes after five days
Step 3: Prepare Containers and Soil
Now that the potatoes are sprouted, I get my containers ready. I also mix a rich soil blend to give the plants everything they need.
Line the Containers
I use several containers and line each one with a plastic bag. This makes cleanup easier later and helps keep moisture from leaking out.

Line the containers
Fill with Potting Soil Mix
I fill each container with regular garden soil.

Fill with garden soil
Then, I mix in a few extras to improve drainage and boost nutrients:
- A little ash
- More soil
- Some rice husk

Mix in a few extras
Once the mix is ready, I pour it into the containers until they are filled to the top.
- Fill the mix to the top
Step 4: Plant the Sprouted Potatoes
With the soil ready, it’s time to give the potatoes their new home!
Create a Trench in the Soil
I use my hands or a small tool to create a shallow trench right in the center of each container. The trench doesn’t need to be deep—just enough to hold the potato pieces.

Create a trench
Add the Potato Pieces
I place about three sprouted potato pieces into each trench. I try to space them evenly so each piece has room to grow. The sprouts should be facing upward.

Add the potato pieces
Cover with Soil
Once the potatoes are in place, I gently cover them with the surrounding soil. They should be fully buried. I repeat this for each container until I’ve planted all the potatoes I prepared.

Cover with soil
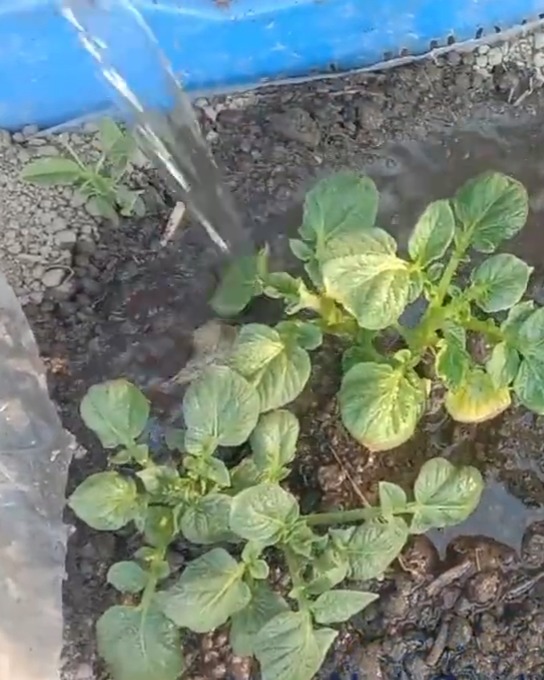
Step 5: Track Growth Over Time
Watching the plants grow is such a rewarding part of this process! I check in often to see their progress.
After 25 Days
At this stage, the potatoes sprout and turn into small green plants. Some containers have 4–5 plants, while others have just 1 or 2. That’s totally normal!

Potatoes after 25 days
After 32 Days
The plants are getting taller now. I water them well, really soaking the soil. A deep watering helps the tubers form underneath.

Potatoes after 32 days
After 50 Days
The containers are full of lush, green plants! They look strong and very healthy. I know by now that small potatoes are starting to form in the soil. It’s exciting to imagine how big they’ll get!
Potatoes after 50 days
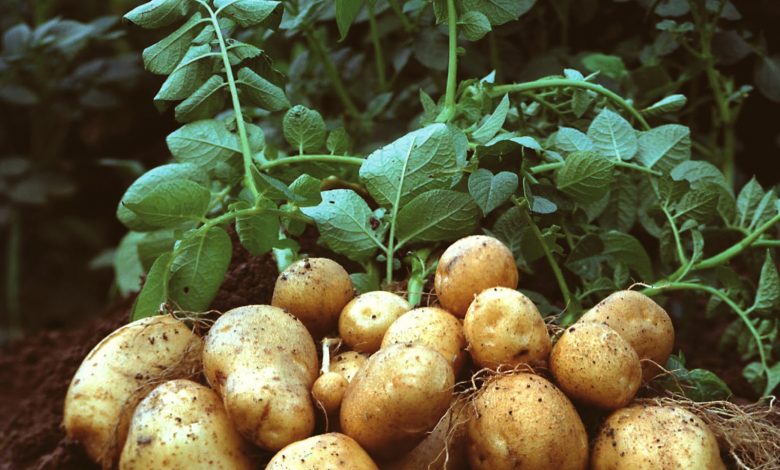
Step 6: Harvest Time – 75 Days Later!
This is it—the moment I’ve waited for with so much excitement! Harvest day!
The Big Reveal
On day 75, I start gently digging into the containers. I’m always thrilled to uncover the potatoes hiding under the soil! It’s like finding buried treasure!

Harvest after 75 days
No Fertilizer Needed
What amazes me the most is this: I don’t use any fertilizer at all. I just water them regularly, especially when the soil feels dry. And still, I get big, firm, beautiful potatoes perfect for cooking!

Big, firm potatoes
Bonus: What Can You Make With Potatoes?
Once I finish harvesting, it’s time to eat! Here are a few simple dishes I love making with homegrown potatoes:
- Crispy fries
- Mashed potatoes
- Roasted potato wedges
- Creamy potato soup
- Potato salad
Nothing beats the flavor of fresh potatoes that you grew yourself!

Crispy fries
Wrapping Up
That’s how I grow potatoes in containers—from start to finish. No need for a big garden, just a few containers, some soil, and a little care. It’s easy and fun, and the results are so worth it! Are you ready to try growing your potatoes? Let me know how it goes in the comments—I’d love to hear about your harvest!